Why PEX Piping Has Transformed Home Plumbing
I’ve been a “DIY plumber” for about 30 years doing some sort of installation in all 9 of our homes. My dad taught me early on how to cut, fit and solder copper, and I’ve become pretty proficient at it. However, I can’t tell you how many times in my early years, that I finished a copper job, turned on the water, and there it is, a drip! So then back to the beginning, drain the system, dry things off, sweat off the fitting you just sweated on, and start all over. Copper can be frustrating for the DIY plumber. Then PEX came along to the rescue!
Since I started using PEX about 15 years ago, I can honestly say, I have NEVER had a crimped PEX joint leak. From the first time I ever crimped a ring, to the current renovation project on my daughter’s townhome, I’m batting 1000 over hundreds of crimp joints! PEX crimp joints are just that robust, any DIY’er can master PEX plumbing from the get go.
PEX became popular in Europe in the 1970’s and shortly later gained popularity in the United States. It truly is a marvel in the world of modern plumbing and has emerged as a dominant player revolutionizing how we handle plumbing in our homes. In addition to my story, let’s explore in more depth what makes PEX the go-to choice for both DIY enthusiasts as well as professional plumbers?
Understanding PEX: More Than Just Plastic Tubes
Cross-linked polyethylene, or PEX, has become synonymous with modern plumbing efficiency. Its flexibility, cost-effectiveness, and ease of installation outshine traditional materials like copper and galvanized steel. But there’s more to PEX than meets the eye.
Benefits That Speak Volumes
- Cost-Effectiveness: PEX is significantly cheaper than its metal counterparts. This affordability extends not just to the material itself but also to the overall installation costs. On average, the cost of an installation done with PEX can be between 25% – 50% less expensive overall.
- Ease of Installation: The flexibility of PEX piping makes it incredibly easy to work with, especially in tight spaces. I’ve had to work water lines around corners inside of walls on room additions. I’ve done it both with PEX and copper, the difference in difficulty is night and day. This flexibility, combined with the use the correct tools makes installation a breeze for almost anyone.
- Durability: PEX doesn’t corrode or degrade like metal pipes, ensuring a longer lifespan without the risk of contaminating your water supply.
Installation: Tools and Techniques
Installing PEX is incredibly easy, with the right tools and a bit of know-how, it’s a task well within the reach of almost all homeowners. Here’s a list of most of the tools available for working with PEX. You can decide based on this list what you will need for your particular job:
- PEX Cutter: A specialized cutter designed to make clean, straight cuts on PEX tubing without crushing or deforming the pipe.
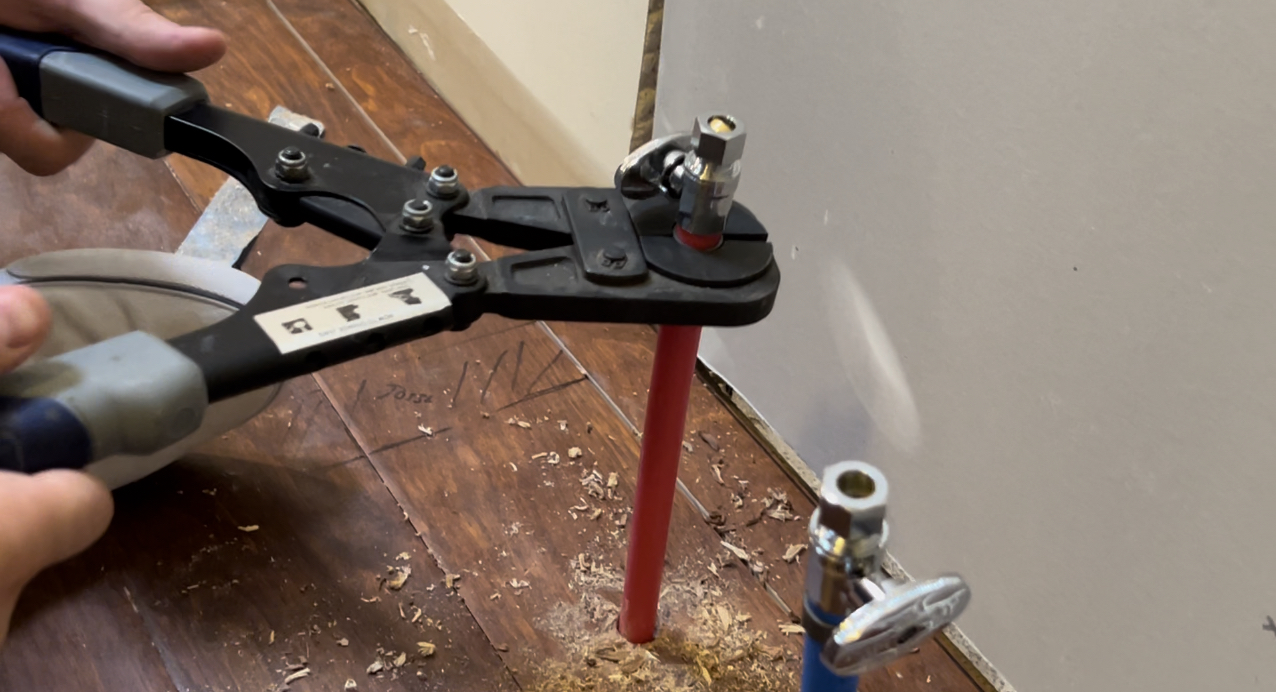
- PEX Crimp Tool: Used to crimp the metal crimp rings onto PEX piping and fittings to secure the connection. There are different sizes of crimp tools based on the size of the PEX pipe and crimp rings.
- Crimp Rings: These are the metal rings (usually made of copper or stainless steel) that are crimped onto the PEX pipe and over the fittings to create a watertight seal.
- Decrimping Tool: In case of a mistake or the need for adjustment, this tool is used to cut the crimp rings without damaging the PEX tubing.
- Go/No-Go Gauge: This tool is used after crimping to ensure that the crimp has been made correctly. It checks the size of the crimped ring to ensure it’s within the acceptable range for a secure fit. Don’t skip this step. The gauge is inexpensive and it’s important for the long term viability of your crimps to make sure they are crimped to spec.
- PEX Expander Tool: Required for installations using the expansion method (specifically for PEX-A tubing). This tool expands the end of the PEX pipe so that a fitting can be inserted. After expansion, the pipe contracts to form a tight seal around the fitting.
- Expansion Rings: Used with the PEX expander tool, these rings are placed on the end of the PEX pipe before it is expanded.
- Pipe Supports and Clamps: To secure PEX piping along its run and prevent sagging or movement.
- Stapler for PEX: If installing PEX in a radiant heat system, a stapler can be used to secure the PEX tubing to the subfloor.
- PEX Bending Spring: Helps to bend PEX tubing at desired angles without kinking the pipe, especially useful in tight spaces.
- PEX Fittings: Various fittings like elbows, tees, couplings, and adapters are needed to connect PEX pipes in different configurations and to transition to other types of plumbing materials.
- Tubing Uncoiler: For larger projects, a tubing uncoiler can be very helpful in managing and dispensing long lengths of PEX tubing.
Not all of these tools are essential for all successful PEX installation. However, a few are needed for ensuring that the piping is cut, connected, and secured properly for a reliable plumbing system.
You can pick a crimper up on Amazon for less than $40. I’ve had this one for about 15 years. It has inserts to crimp 1/2″, 3/4″ and 1″ pipe. The process is simple, just slip a crimp ring over the pipe, position it properly so it’s over the center of the barbs on the fitting and close the crimper around the crimp ring. The Crimp ring will slide easily, so take care to make sure it’s positioned over the center of the barbs on the fitting and don’t let it move when you are ready to crimp down. Once crimped, it’s permanent and it can only be removed with a de-crimping tool..
A few Critical things to Make Sure of When Working with PEX
- Make sure when you cut the pip, it’s cut perfectly straight.
- Make sure you push the pipe all the way on to the fitting until it hits the stop on the fitting
- Make sure the crimp ring is positioned about 1/8″ from the stop on the fitting
- Make sure the crip ring is completely inside of the crip tool before crimping
- Check the crimp with a Go-No-Go gauge on every crimp joint.
- If the crimp doesn’t meet spec with the Go-No-Go gauge, re-calibrate your crimp tool and replace the out of spec crimp.
How To Stop Crimp Ring From Sliding: Pro Tip From John:
To avoid unwanted movement and mis-placement of the crimp ring, take a pair of pliers or channel locks and ever so slightly give the ring a squeeze in the position where you want it crimped. The crimp ring is copper, so it is very malleable. The light squeeze from a pair of pliers will very slightly deform the perfect circle and give it some friction so it doesn’t slide easily on the pipe. Take caution however to not to overly compress and deform the ring too much. Once you crimp it with the crimping tool, the slight squeeze that you put on it with the pliers will be eliminated and the joint will be perfectly crimped. Not sure if plumbers will disagree with this step, but I’ve done it hundreds of times and it has never failed. It’s especially useful on crimps on pipes that are vertical.
Fittings and Rings
There are dozens of types of fittings elbows, (Tee’s, couplings, valves, etc) that you can get inexpensively that will allow you to build any shape of system that you need very easily. Every type of fitting is installed the same way with a crimp ring and a crimping tool to crimp the ring over the PEX tubing to secure the leak free connection.
Types of PEX Piping
Many DIY’ers think that the various types of PEX Pipe are Red, Blue and White. While this isn’t incorrect PEX piping comes in several different types, each with unique properties and applications. The most common types are PEX-A, PEX-B, and PEX-C. Here’s a brief overview of each:
- PEX-A:
- Manufacturing Process: PEX-A is made using the peroxide (Engel) method, which results in a more flexible and resilient pipe.
- Flexibility: It’s the most flexible of the three types, making it easier to install, especially in tight spaces.
- Expansion Capability: PEX-A can expand and return to its original size, which is beneficial for cold environments as it’s less likely to burst if the water inside freezes.
- Memory: This type has a ‘shape memory’, meaning it can be expanded and will return to its original shape, useful for expansion-type fittings.
- Cost: Generally, PEX-A is the most expensive of the three types due to its manufacturing process and material properties.
- PEX-B:
- Manufacturing Process: PEX-B is made using the silane (moisture cure) method, leading to a slightly stiffer product than PEX-A.
- Resistance to Chemicals and Chlorine: It has a higher resistance to chlorine and other chemicals, making it a good choice for areas with highly chlorinated water supplies.
- Less Flexibility: While still flexible, PEX-B is slightly more rigid than PEX-A, which can make it a bit harder to work with in certain installations.
- Cost: PEX-B is generally less expensive than PEX-A and is widely used in residential plumbing applications.
- PEX-C:
- Manufacturing Process: PEX-C is manufactured using the electronic (irradiation) method, which results in a pipe that’s more environmentally friendly to produce.
- Flexibility and Strength: It’s less flexible and has a lower burst strength compared to PEX-A and PEX-B.
- Cost: PEX-C is often the least expensive option, but it’s also less commonly used due to its physical properties.
Each type of PEX has its advantages and ideal applications. The choice between PEX-A, PEX-B, and PEX-C will depend on the specific requirements of your plumbing project, including budget, installation environment, and desired longevity and performance of the piping system.
PEX Piping Sizes
PEX Pipe Comes in Various nominal diameters, here’s a table showing what it typically available and what it’s normally used for:
| PEX Pipe Size | Typical Use |
|---|---|
| 1/4 inch | Ice makers, under-sink water filter systems |
| 3/8 inch | Small fixtures, branch lines from larger pipes |
| 1/2 inch | Main lines and individual fixtures in residential plumbing |
| 3/4 inch | Larger water supply lines for more volume, such as main lines in a house |
| 1 inch | Large residential systems, commercial applications for high water volume |
Pex Sticks
The piping itself also comes in various lengths and diameters of straight pipe, or you for larger jobs, you can buy it in large coils. Straight PEX piping, often referred to as PEX sticks or lengths, typically comes in a variety of standard sizes. The most common lengths are:
- 5 feet
- 10 feet
- 20 feet
These lengths are designed to offer convenience for various plumbing projects, allowing for easier handling and reduced need for connections compared to longer coils. The availability of specific lengths can vary depending on the manufacturer and the supplier. For larger or more specialized projects, it’s always a good idea to check with plumbing supply stores or directly with manufacturers for the availability of specific PEX pipe lengths.
PEX Coils
At home supply stores, PEX tubing is commonly available in coil lengths that cater to a range of plumbing needs. The typical coil sizes you’ll find are:
- 25 feet
- 50 feet
- 100 feet
- 300 feet
- 500 feet
- 1000 feet
These coils are particularly useful for larger projects or for situations where you want to minimize the number of connections, as they can be cut to the desired length. The availability of specific coil sizes can vary depending on the store and the brand of PEX tubing. It’s always a good idea to check with your local home improvement or plumbing supply store for the exact sizes they have in stock.
Specialty Fittings
There are also fittings that will help position the ring properly in place before crimping. However, the crimp ring slides easily on the pipe and when you place the crimping tool over the ring, and it can be a little difficult to see exactly where it’s being crimped. If it move slightly as you clamp down, you could crimp it too low and have a bad joint.
Connecting Worlds: PEX and Copper
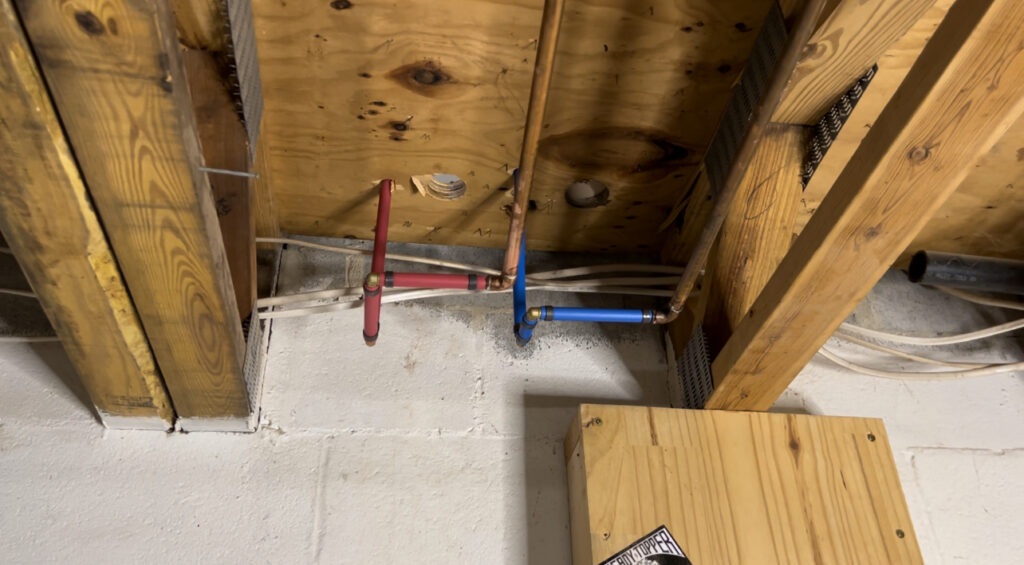
One common question is how to connect PEX to copper. If you are adapting to copper, you will either have to solder an adapter fitting on or use an compression fitting. If you are comfortable with soldering, a sweat fitting in my opinion is a better choice. It will create a very strong and permanent connection to the existing copper pipe. In this job, I used a 1/2″ x 1/2″ M Sweat adapter to transition from the 1/2″ copper to the 1/2″ PEX for both the hot and cold supply lines.
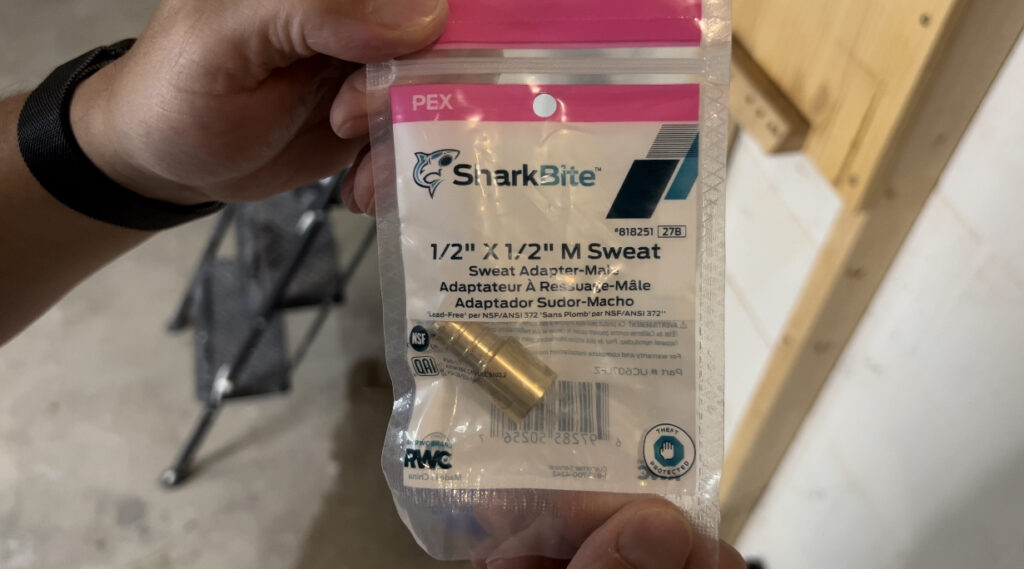
The adapters are shown here which makes for a neat job.
Compression fittings:
If you are a DIY’er and you are not comfortable with sweating joints, a compression fitting is the better choice. There’s no heating or soldering required and it’s a quick clean way to adapt copper to PEX. Take caution however that when cutting the copper pipe, you do it cleanly and don’t deform the end of the pipe or the compression fitting may leak. For that matter, the same goes for a sweat fitting. The downside of a compression fitting is that it may not last as long as a sweat fitting, and it’s not as strong. But, it is a viable option.
The Rodent Dilemma: Protecting Your PEX
While PEX has many advantages, it’s not without its challenges. One lesser-known issue is its susceptibility to rodent damage. Rodents can and do chew through PEX, posing a risk to your plumbing integrity.

Safeguarding Your Pipes
To protect your PEX piping from rodents, consider these steps:
- Regular Inspections: Keep an eye out for any signs of rodent activity and address them promptly.
- Physical Barriers: Use rodent-resistant materials or coverings to shield your PEX pipes, especially in vulnerable areas like basements and attics.
- Professional Help: If you suspect a rodent infestation, don’t hesitate to call in pest control experts.
While discussing protective measures against rodents, it’s also crucial to understand broader strategies for dealing with mice in your home. For a detailed guide on effectively getting rid of mice in walls, a common entry point for these pests, check out our comprehensive article How to Get Rid of Mice in Walls.
Embracing the PEX Revolution
PEX piping represents a significant leap forward in home plumbing. Its benefits, from cost savings to ease of installation, make it an attractive option for new constructions and renovations alike. However, being aware of its vulnerabilities, such as the risk posed by rodents, is crucial for long-term satisfaction.
Remember, the key to successful PEX installation lies in understanding the material, using the right tools like the PEX crimp tool, and taking proactive measures to protect your investment. Embrace the PEX revolution and enjoy a modern, efficient plumbing system in your home.