To wire a 3-way switch, start by turning off the power to the circuit. Run a 14-3 wire between two switch boxes, connecting the red and white wires to the traveler terminals on both switches. Connect the black wire from one switch to the common terminal on the other switch. Run a 14-2 wire from the first switch box to the light fixture, and another 14-2 wire from the electrical panel to the first switch box. Connect the black wires and ground wires appropriately in the first switch box. Finally, turn the power back on and test the switches.
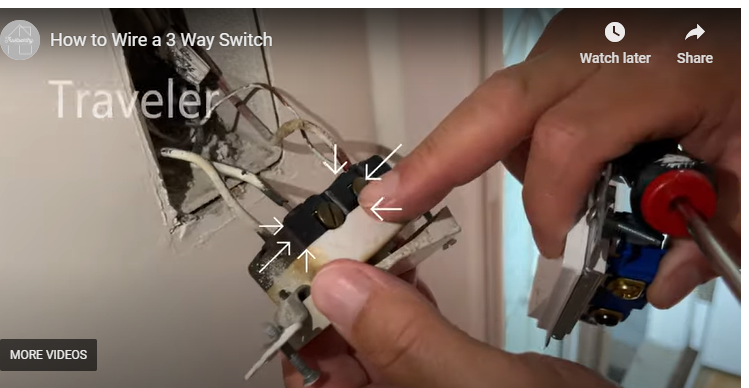
Video: How to Wire a 3-Way Switch
Sound a little confusing, watch the video (below) explaining what a 3-way switch is, how it works, and how to wire them. Watch that first, then you can come back to this post for reference when work with a 3-way switch.
Seems Complicated – But is it?
Understanding how to wire a 3-way switch and how it works is important for the DIY’er. You may want a different color or style, or the switch may just be old and worn out so you want to change it out with a new one. It may seem simple to buy the switch you want, flip the breaker off and install the new switch. But, if its a 3-way switch, things can get a little tricky, so please read on.
I’ll start off by emphasizing that working with electrical systems in your home should always be left to a qualified electrician if you are not 100% sure of what you are doing. I am not an electrician, but I am an engineer and a life long do it yourselfer. I’ve spent 35+ years learning and doing things in the many homes we have owned, so I’m confident in my abilities and knowledge to handle this type of task.
But I can’t state strongly enough, if you have not worked with electrical systems in your home, and you are not 100% confident in your ability to handle this type of task, please hire a qualified electrician.
What is a 3-Way Switch?
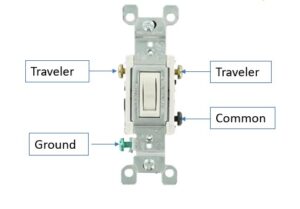
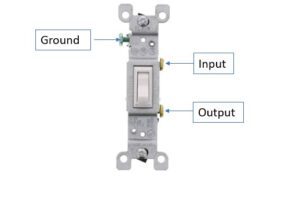
A 3 way switch, technically called a Double-Pole-Single Throw Switch, gets is name from the fact that it has 3 terminals (compared to 2 for a common single-Pole-Single-Throw switch – see below. This type of switch allows you to control a circuit, typically a light circuit, from 2 different locations. Two of the terminals on a 3-way switch are called travelers, these connect the 2 switches together with “traveler wires” and are typically lighter in color, made from either copper or bronze. The 3rd terminal is the common terminal, it’s normally a darker color such as black. There’s also a ground terminal that is typically green that is not part of the body of the switch.
How A 3-Way Switch Works:
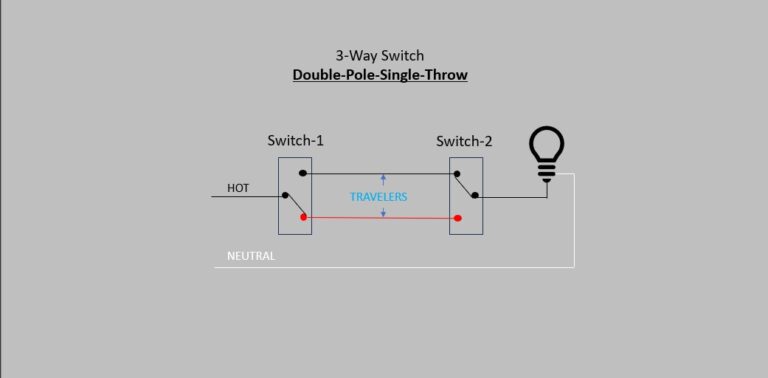
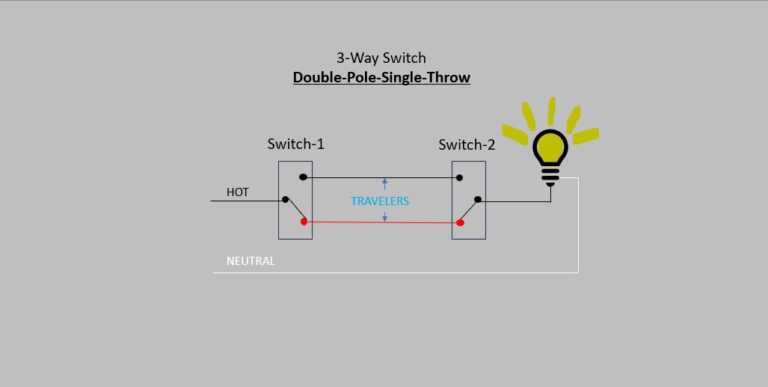
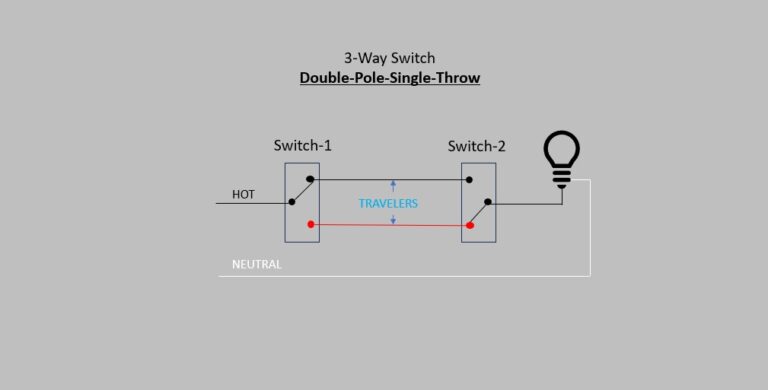
The 3 figures below represent a 3-way switch circuit in the form of a line diagram illustrating the (2) Double-Pole-Single-Throw-Switches.
- FIG-1 shows Switch-1 in the down position, and Switch-2 in the up position. Following the line diagram, you can see that the circuit is not completed, and the light is off
- FIG-2 shows both Switches in the down position which completes the “red” circuit, and the light turns on
- FIG-3 shows Swich-1 Up and Switch-2 Down and the circuits is open again, and the light is off.
I think you get the idea. Flipping either switch will turn the light on or off depending on the position of the other switch. This is how a 3 way switch works, now lets look at how it is actually wired.
HOW TO WIRE A 3-WAY SWITCH: Step by Step Instructions:
Step 0: Safety First
Always turn off the power to the circuit you’re working on. Locate the circuit breaker or fuse box and flip it to the off position. Make sure you verify the electric is off by flipping both 3-way switches in the circuit to see if the lights do not turn on.
Now let’s look at how a 3-way switch is physically wired using the example of a light at the top of a staircase, controlled by a switch at the top and bottom of the staircase.
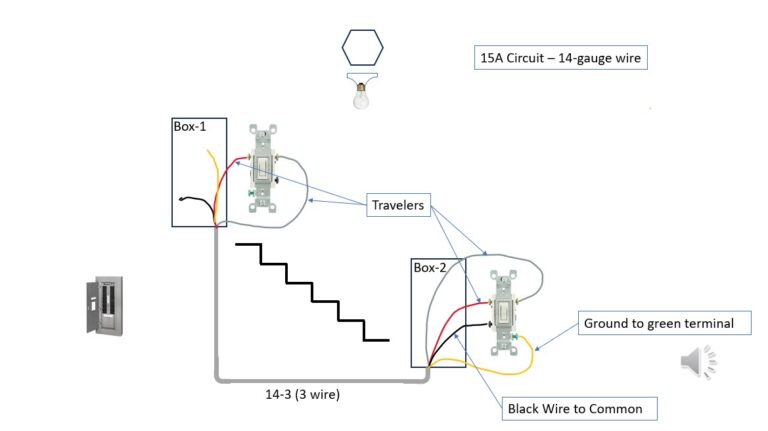
Step 1 (Fig Below): Connect Box-1 to Box-2:
A 14-3 wire (contains 3 conductor wires and a ground wire) is run from Box-1 to Box-2. The conductor wires are colored Black, Red, and White, and there is also a bare copper (ground) wire. In this example, the Red and White Wires wires are used for the “traveler” wires and connected to the traveler terminals on both switches. the Black wire is connected to the common terminal on Switch-2, while the other end of the black wire is left unconnected for now along with the ground wire in Box-1.
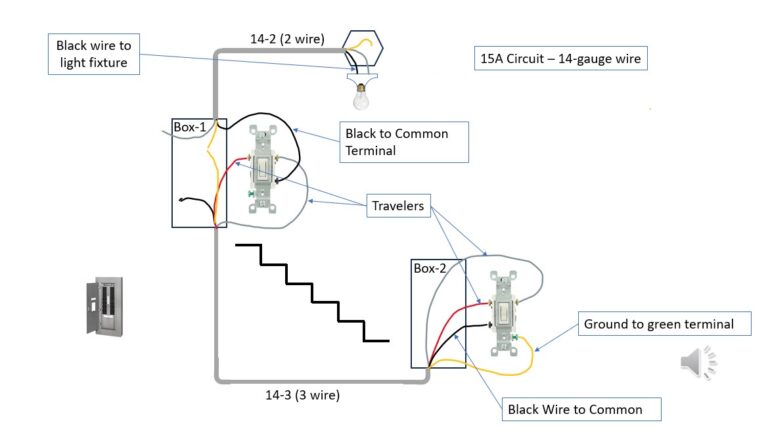
Step 2 (Fig Below): Connect Box-1 to the Light Fixture
A 14-2 wire (contains 2 conductor wires and a ground wire) is run from Box-1 to the Light Fixture. The Black wire is connected to the common terminal on Switch-1, while the Black wire and the ground are left unconnected for now in Box-1
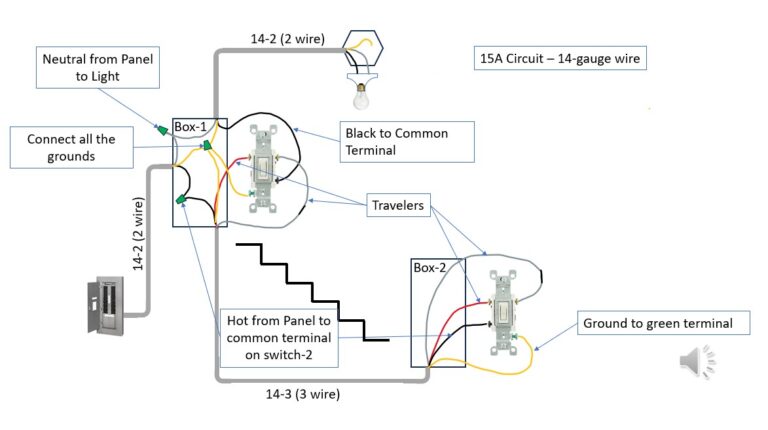
Step 3 (Fig Below): Connect Box-1 to the Electrical Panel:
Another 14-2 wire is run from the electrical panel to Box-1. The Black wire from the 14-2 wire is wire nutted together with the Black wire from the 14-3 wire connecting Box-1 and Box-2. The White wire from the electrical panel is wire nutted together with the white wire going to the light fixture. Finally all of the grounds are connected in Box-1 with a wire nut and we’re done.
Step 4: Turn the Power Back On:
Flip the breaker back on and make sure everything works like it should. Your Done!
Typical Applications involving 3-way Switch Circuits
There are many applications for using a 3-way switch circuit, so I’ve listed a few here:
- Staircases: Control lights from top and bottom for safety.
- Hallways: Operate lights from either end for convenience.
- Rooms with multiple entrances: Easily turn lights on/off from different locations.
- Garages: Control lighting from inside and outside.
- Large rooms: Enable access to switches from multiple points.
- Outdoor lighting: Manage lights from different entrances or areas.
This may not be an all inclusive list, but this covers a majority of applications for where a 3-way switch would be used.
Be sure to Check out our article: Homeowner Essentials: Tips that all homeowners should know!
I Hope you found this useful!
CHECK US OUT ON FACEBOOK, YOUTUBE AND INSTAGRAM!
If you have a question or a message for us, enter it here
Otherwise you can post a public comment below – Thanks for visiting